Deconstructing the Iconic Apple Watch Bubble UI

When the first Apple Watch launched in 2015, I was blown away by the design of the home screen in WatchOS. The layout deviates from more standard, grid-based app organization methods, and instead proposes an original, visually dynamic interface.
Five years later, I still find myself in awe when opening my watch to this smooth, chic UI. However, from an engineering point of view, I continue to be perplexed by the layout’s under-the-hood functionality.
As an experienced application developer, I know that constructing navigation flows and layouts are critical to any app’s foundation. Apple accomplishes all this, plus a touch of flexibility, satisfaction, and curiosity.
Sure, I enjoy building robust app layouts with CSS Grid and Flexbox, among other web and mobile technologies, but the complexity behind the Apple Watch Bubble UI does not fit any of these molds. I made it my mission to investigate all aspects of the layout, especially exploring the geometry and surrounding mathematics that orchestrate the layout’s visual design.
Disclaimer: The discussion of the UI’s underlying functionality and design stems only from my personal insights; Apple most likely implemented the layout a bit, or a lot, differently.
Basic Layout Geometry
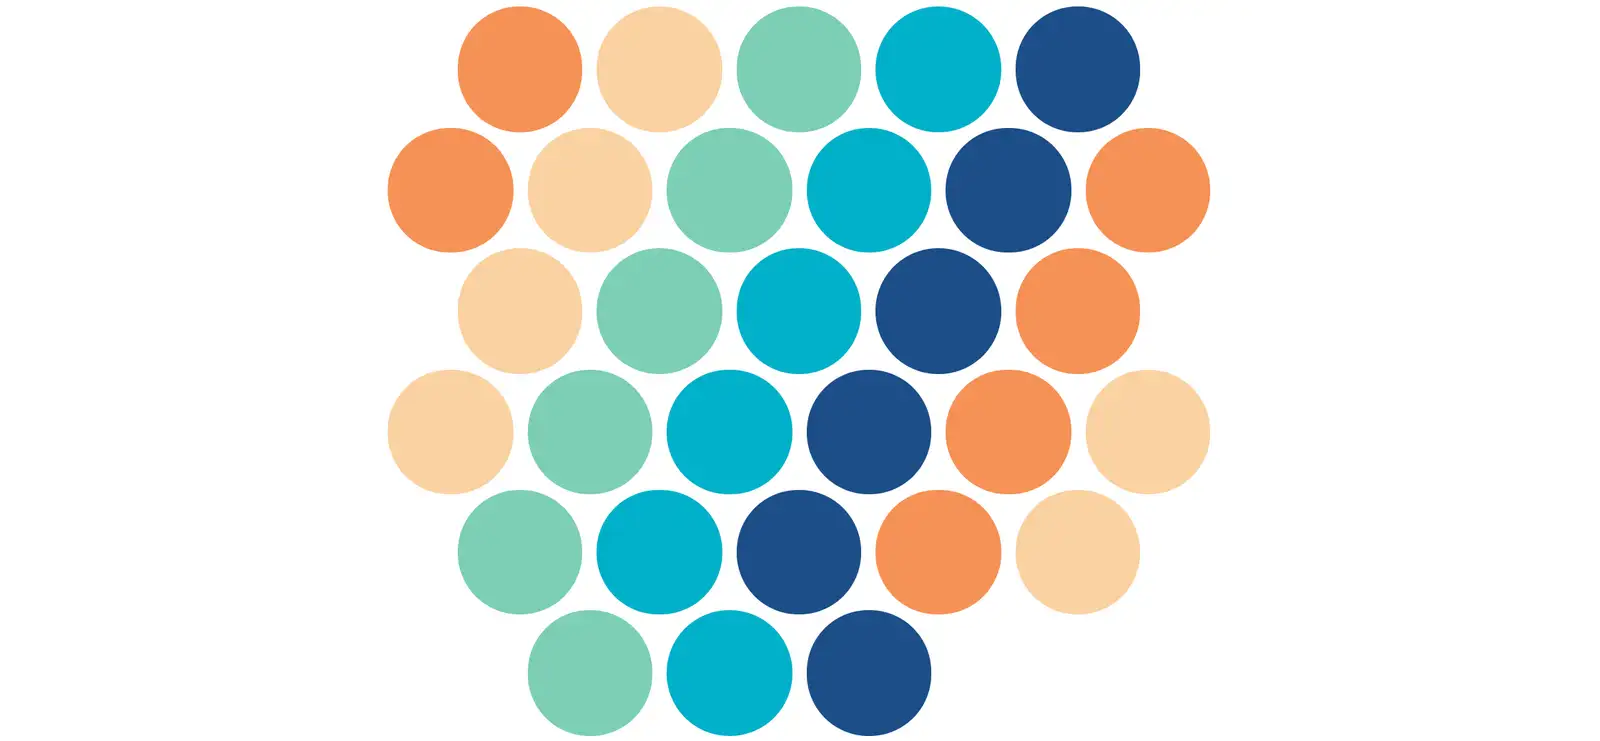
Let’s start with a basic honeycomb grid for our bubbles. We’ll handle sizing and other effects later on. Every other row is one bubble shorter than the others, and the last row may be incomplete, though centered.
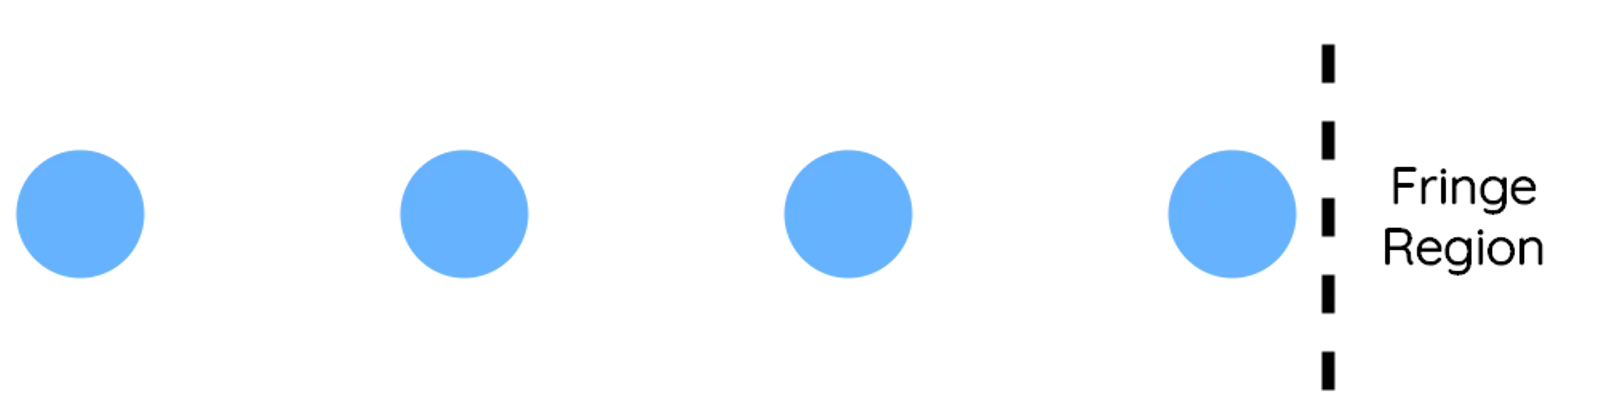
As seen in the graphic, the UI can be broken down into three concentric regions: the center, fringe, and outer regions. The former two will be most critical when modeling how bubble size and position changes across the screen. For all cases, a bubble is considered to be inside a region if that region contains the bubble’s center.
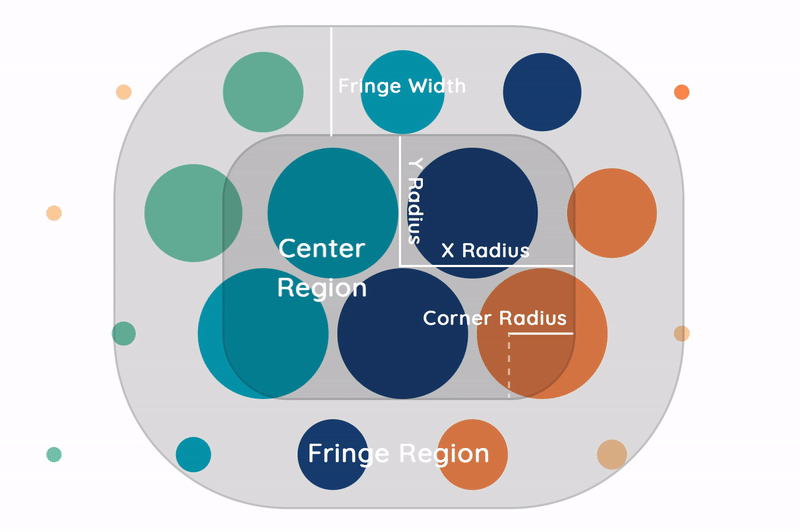
The center region is defined as the centered (rounded) rectangle bounded by a x radius and y radius, and a corner radius measured from the outer edge. All bubbles in the center region are rendered at their maximum size.
The fringe region is defined as the space outside the center region within a certain fringe width of its outer edge. This region is used to contain each bubble’s transition from minimum to maximum size. When a bubble enters this region, it does so at its minimum size, which increases linearly until reaching its maximum size upon entry of the center region.
The outer region is defined as all space on the 2D canvas not comprising the center and fringe regions. Here, all bubbles are minimized.
What about Circular and Unrounded Rectangular Regions?
The center and fringe regions take circular form when x radius, y radius, and corner radius are all equal. Furthermore, the center region becomes unrounded when corner radius is zero; however, the fringe region’s corners will still be rounded with a radius of fringe width.
Calculating Bubble Size From Location
Diving deeper into the layout’s underlying mechanisms, let’s use our defined regions to develop a mathematical model that calculates a bubble’s size as a function of its location on the screen.
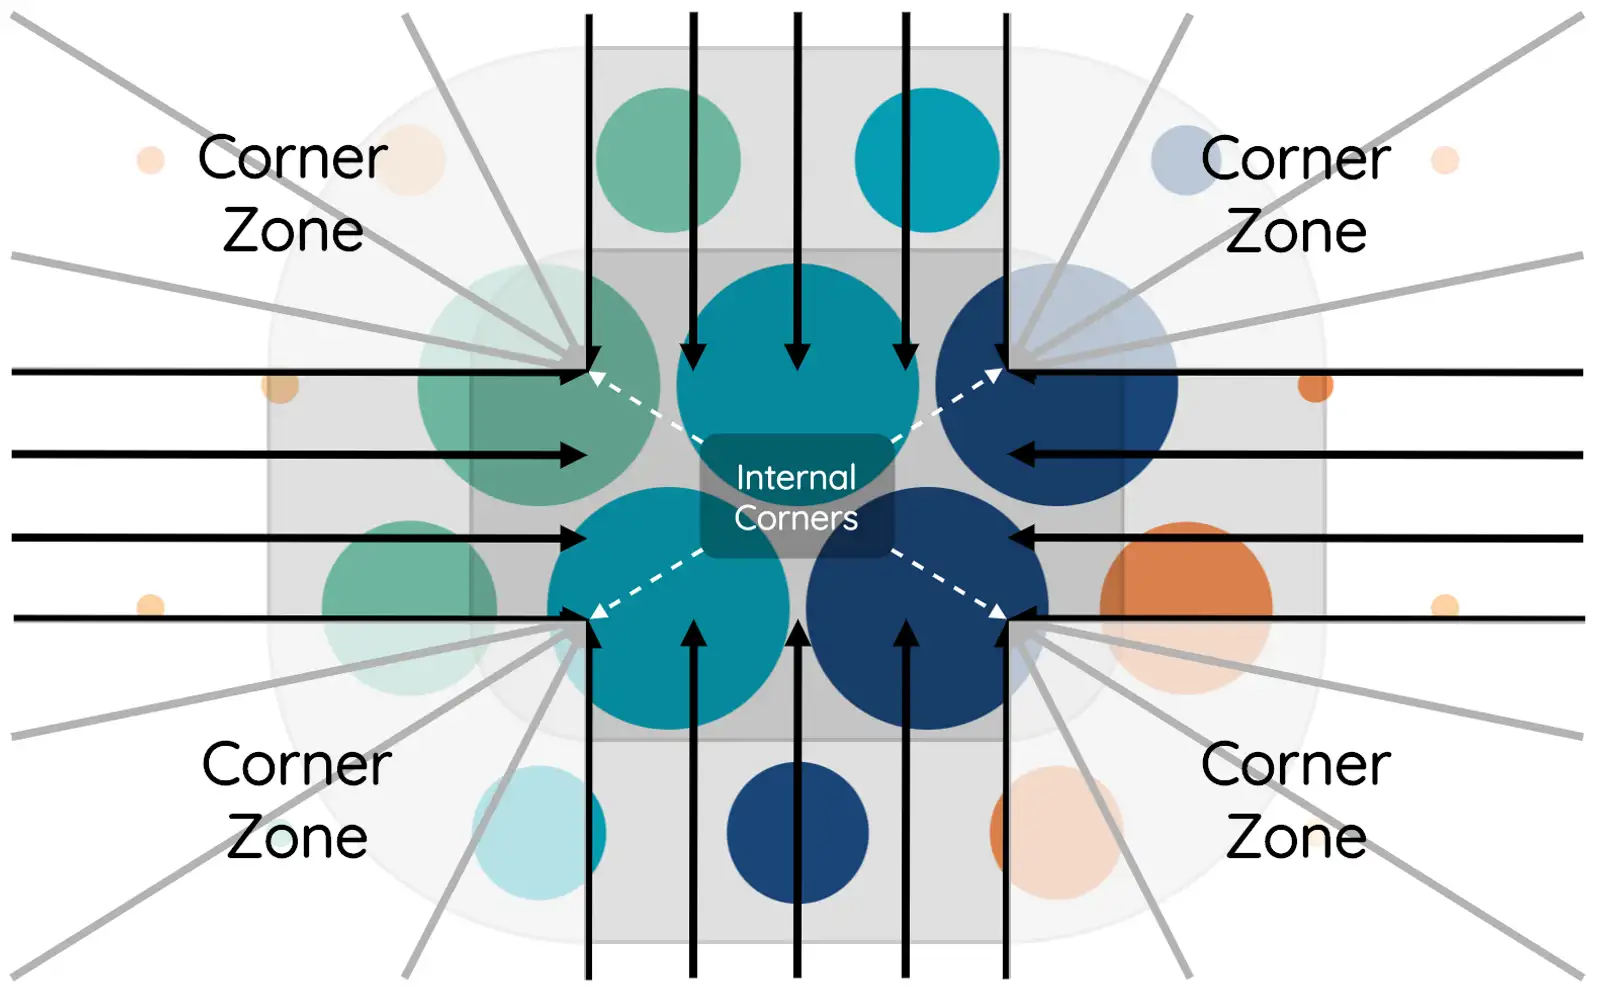
First, we need to define another key visual landmark: the corner zone.

Corner Zones are defined as the four regions bounded by the corners of the canvas and the internal corner of the center region (inset corner radius from the edge). In corner zones, size remains constant radially with respect to the internal corner. By contrast, bubbles outside corner zones maintain constant size with a constant x or y position.
Note: If the center region is circular, all four internal corners are located at the center. Otherwise, if the center region forms an unrounded rectangle, internal corners are not offset from the rectangle’s outer edge.
Step 1: Determine if Bubble is in Corner Zone
At first glance, it may appear that this would require four separate operations. However, looking at the similarities between all corner zones yields a single expression: A bubble is inside a corner zone if
abs(bubble.x) > x_radius and abs(bubble.y) > y_radiussince the variables x radius and y radius are positive by nature.
Step 2: Determine Concentric Region that Contains Bubble
As previously discussed, bubble size is partially dependent on which concentric region contains its center.
If the bubble is in a corner zone, first calculate its distance to the corresponding internal corner according to the Pythagorean Distance Formula:
distance_to_internal_corner = sqrt((bubble.x - (x_radius - corner_radius))^2 + (bubble.y - (y_radius - corner_radius))^2)The bubble is contained by the center region if this distance is less than corner radius, or the fringe region if this distance is less than the sum of corner radius and fringe width. Otherwise, the bubble lies in the outer region.
If the bubble is not bounded inside a corner zone, compute its distance to the center of the canvas with the expression:
distance_to_center = max(abs(bubble.x), abs(bubble.y))If this distance is less than the corresponding radius (x or y), it is found inside the center region. Otherwise, if the distance is still less than the sum of the radius and fringe width, the bubble is located in the fringe region. Else, the outer region contains the bubble.
Step 3: Calculate Bubble Size
Bubbles within the center region render with maximum size, while bubbles in the outer region stay completely unmagnified.
The fringe region is where things get interesting, since this region oversees the bubbles’ transition between large and small states.
Any bubble’s current size change is proportional to its current progression through the fringe. In other words, bubbles 30% away from the outer edge have undergone 30% of their upscaling, and bubbles 20% away from the inner edge have done 80% of their upscaling.
Finding a bubble’s current size is therefore accomplished by interpolating its distance to the middle region from the range (0, fringe width) to the range (max size, min size). The computation is as follows:
current_size = max_size + distance_to_middle_region / fringe_width * (min_size - max_size)Where distance_to_middle_region can be expressed as
distance_to_internal_corner - corner_radiusif the bubble is in a corner zone, otherwise
max(abs(bubble.x)- x_radius, abs(bubble.y)- y_radius))Great! This calculation just needs to be repeated for every bubble, initiated every time the user scrolls. Seems simple enough, right? Actually, this is only the tip of the iceberg; though many will be satisfied with the model’s current state, I want to refine the model further to replicate Apple’s feat in UI.
Advanced Features
Compactness
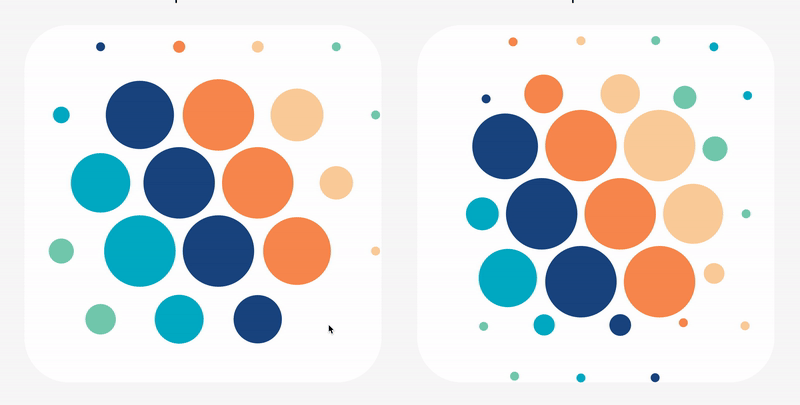
I can’t help but notice that the Apple Watch UI manages to optimize bubbles compactness. Whenever bubbles undergo a size transformation in the fringe region, they maintain the same gutter width as the nearest bubble.
Currently, our model maintains a constant distance between bubbles at all times. Visualized below is our current progress versus our end goal (glimpse ahead).
Implementing optimal compactness introduces a new layer of complexity, since now, in addition to manipulating the size, we need to directly manipulate bubble position.
Similar to before, we are going to translate each bubble according to which concentric region contains it, as well as if the bubble lies in a corner zone.
Bubbles in the center region are already compact and hence do not require translation.
Bubbles in the outer region are translated inward by the amount of its maximum size. If such bubbles reside in corner zones, they translate towards the corresponding internal corner or, otherwise, the canvas’s center.
The fringe region, yet again, oversees the transition between these two states. Just like with size, translation magnitude is derived by distance to center region interpolated from the range (fringe width, 0) to the range (max size, 0).
translation_magnitude = distance_to_middle_region / fringe_width * max_sizeThe same direction rules apply from before.
Gravitation
This feature is a conception of my own imagination — Apple’s Bubble Layout doesn’t necessarily showcase it. Nonetheless, I want to increase bubble compactness further by gravitating distant bubbles towards the center.

Surprisingly, implementing gravitation is easier than any other transformation deconstructed so far.
Put simply, the gravitation effect involves translating bubbles in the outer region towards the fringe region, proportional to the bubble’s distances from the fringe edge. For our purposes, we define a linear relationship between distance to fringe and displacement, but this can be implemented in a number of different ways (exponential, square, square root, etc).

Bubbles in the outer region shall be translated by the amount described in the Compactness section, plus an extra
distance_to_fringe_region * gravitationwhere distance to fringe region is expressed as
distance_to_middle_region - fringe_widthand gravitation is the constant of proportionality. A value of 0 allows for no gravitation effect, while a value of 1 yields no separation between outer bubbles. The effect looks best when gravitation is somewhere between these two extrema.
From Theory to Application
As a web developer who is fascinated with React.js, I want to open up my findings to the design and development community. Following the steps outlined in this article, I created an open source React component available for your team to use today.
The abstraction is highly configurable, with controls for all the discussed variables, plus more. The layout also enables the use of custom bubble components for ultimate customizability. I can’t wait to see what you’ll create!
Conclusion
Thanks for reading, I hope you found it informative! Feel free to leave feedback or questions in the comments section.